JWT Authentication
In this post, we are going to take a look at what is JWT authentication and how to implement it
Authentication
Simply put, authentication is a process of checking who the user is. There are many ways to implement authentication process, and developers need to adopt the appropriate authentication strategy based on service characteristics.
Difference between authentication and authorization
Authentication is a process to check the identification of user, which means to check whether user is officially registered in application database. On the other hand, authorization indicates the process of determining user's permission level and granting the access according to the level.
Why do we need authentication?
HTTP is stateless, which means there is no correlation between multiple requests being successively carried out on the same connection. The reason why HTTP is designed to be stateless1 is because
- Simplicity: Stateless protocols do not need to store any information about the communication between clients and servers.
- Scalability: Stateless protocols do not require any synchronization or coordination between clients and servers.
- Reliability: Stateless protocols would be more reliable as requests do not depend on the previous request.
This will bring about the result that users need to authenticate (a.k.a. login or sign-in) every single time before sending request to the server that requires authentication process because server does not remember the information of the previous request. This will lead to the poor UX.
How can we implement authentication?
Session based
Session is a way to maintain stateful information between client and server. Therefore, session-based authentication indicates a stateful authentication technique where we use sessions to keep track of the authenticated user. Below is the session-based authentication.
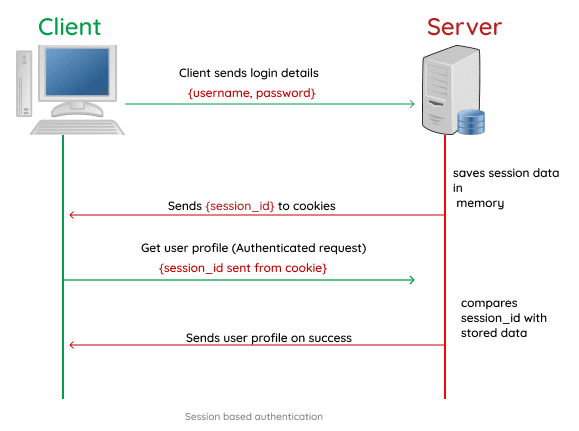
Source: Brian Iyoha
- Client (user) signs in with correct username and password.
- Once authentication information is correct, server will create a session object with unique session ID value inside, put it in cookie and send it back to the client.
- Session cookies are stored on the user's browser only for the duration of the session.
- Every time client sends a request to server, server will check the identification and will return response according to the request (or prohibit).
All sensitive information of a user will be stored in the server, and the only information that client will obtain is session ID which is stored in cookie in browser.
Token based
Meanwhile, access token is a tiny piece of code (normally it's a long string) that contains a large amount of data. Token-based authentication obviously uses token for authentication. Below is how token-based authentication works.
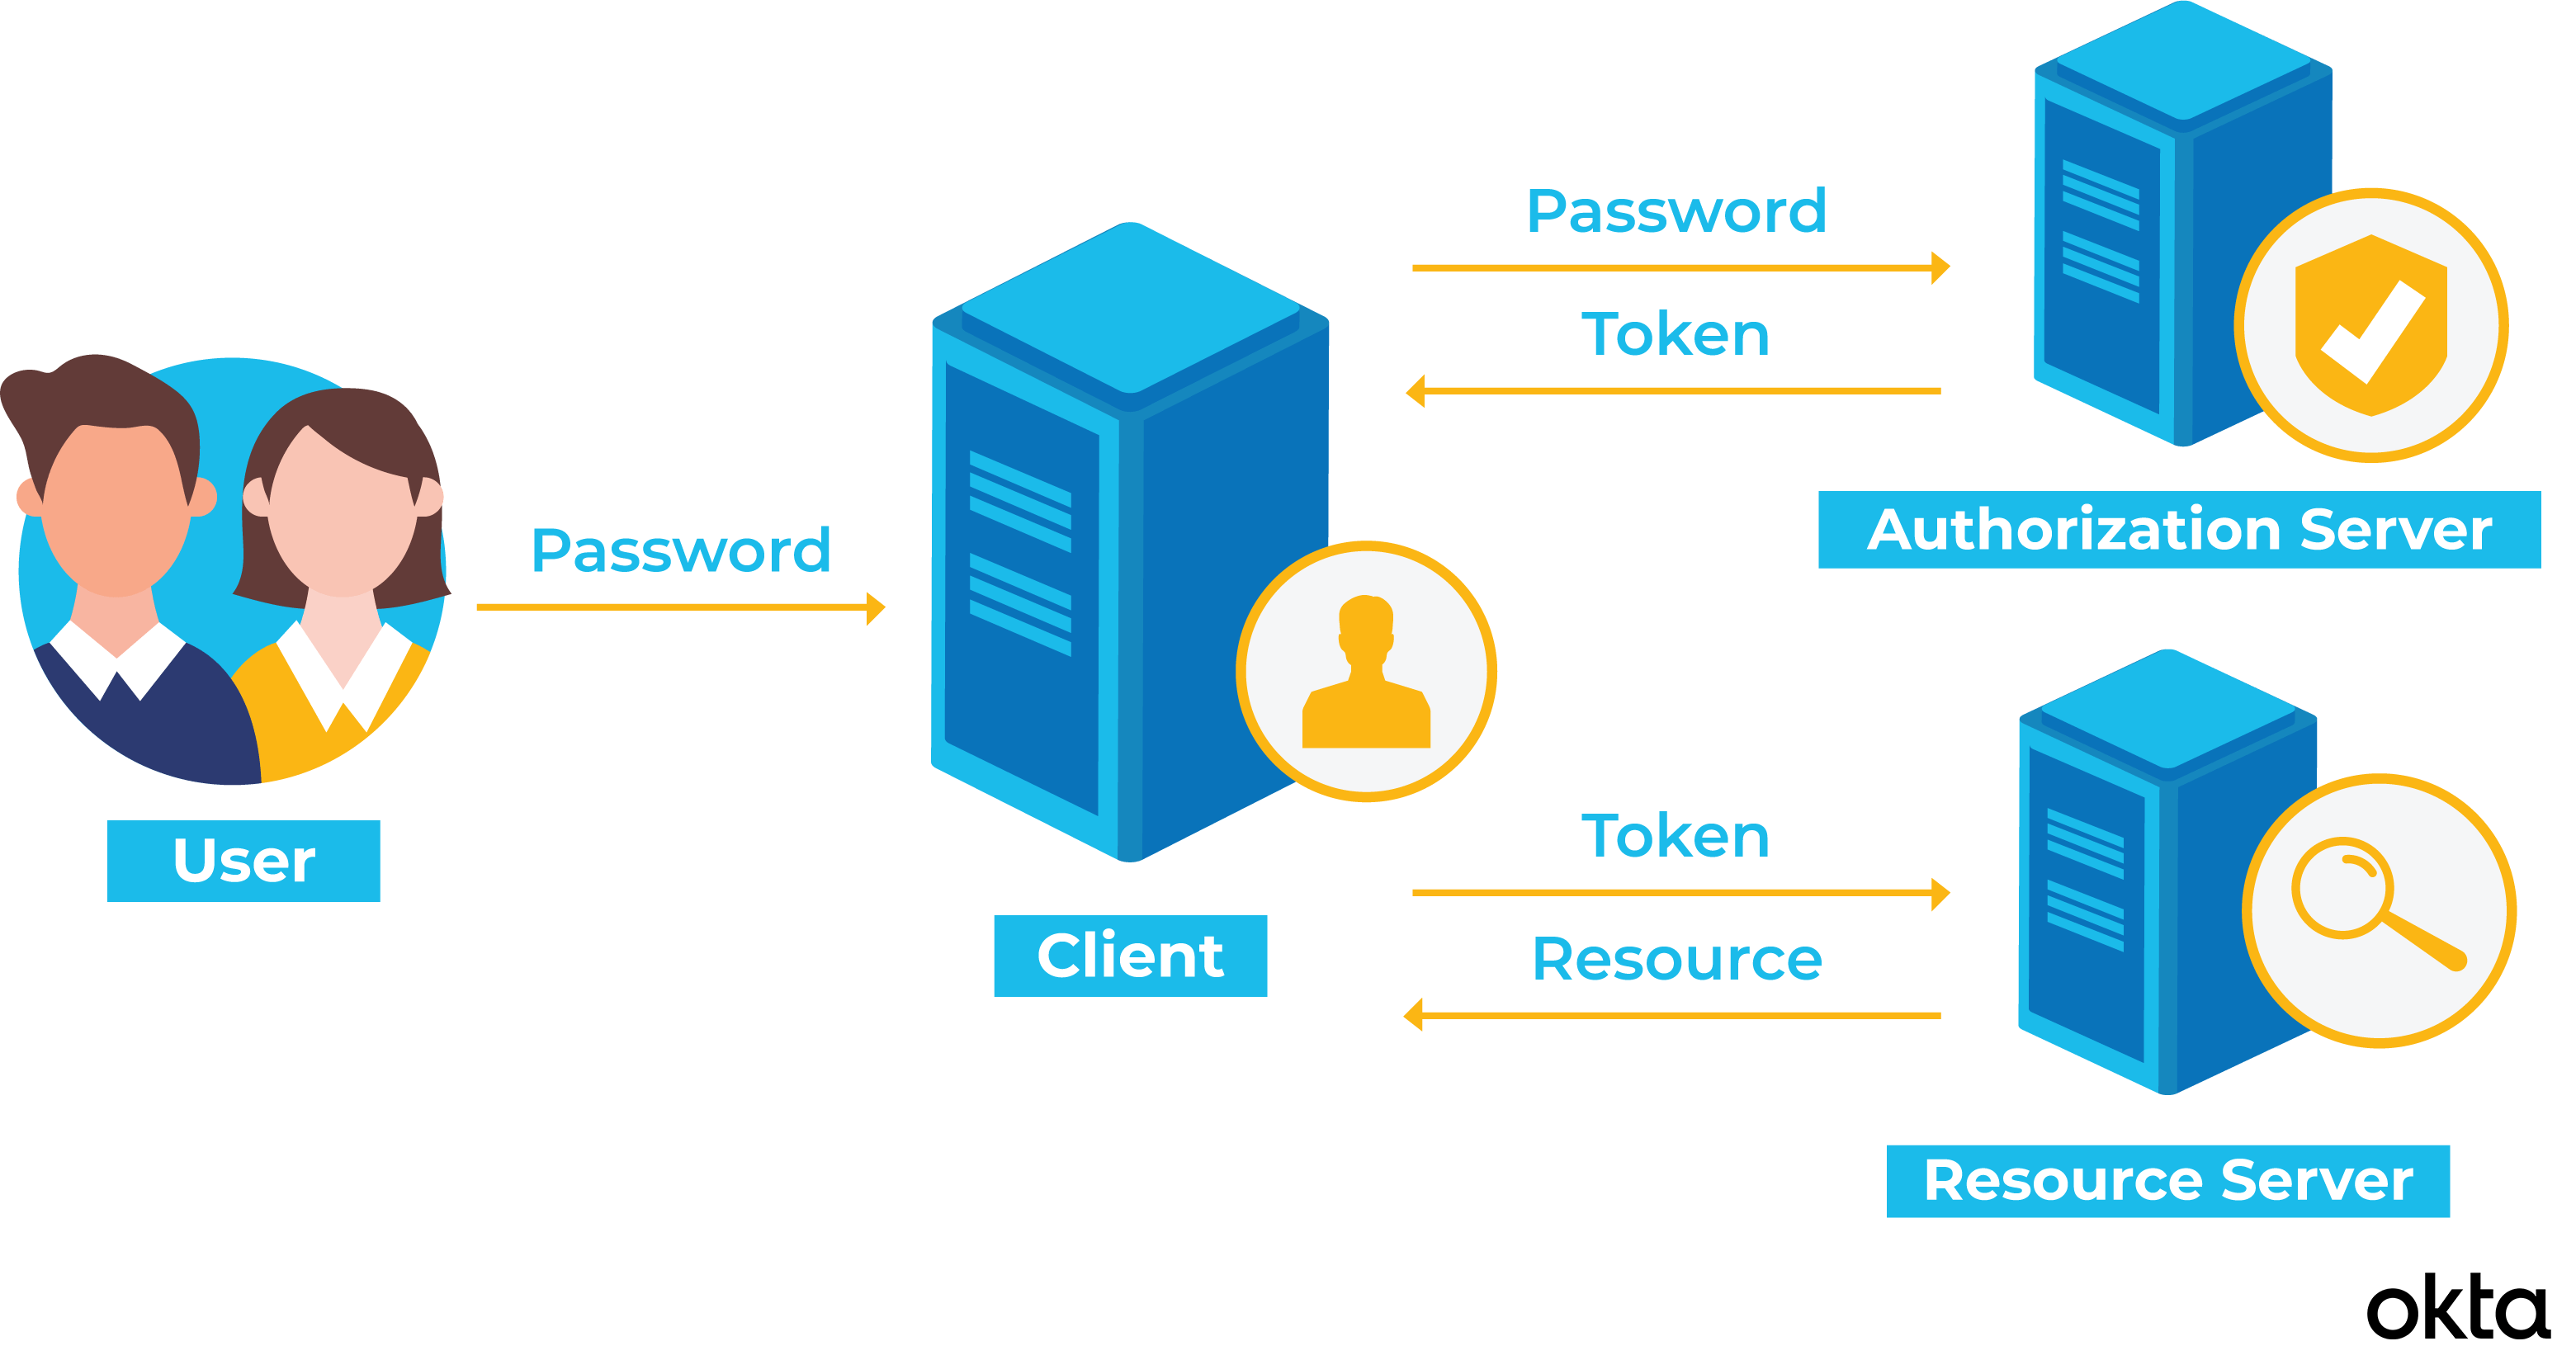
Source: OKTA
- Client (user) signs in with correct username and password.
- Once authentication information is correct, server will create an access token.
- Client will send the access token that was given by server every time it sends requests.
Unlike session-based authentication, server does not need to store all session IDs that provided to the client. Rather, it will just whether the access token is valid, and if it does, it will let client pass.
Summary
Below is the summarization of session-based and token-based authentication
| Question | Session-based | Token-based |
|---|---|---|
| What does client send to server to have their request authorized? | Cookie with Session ID | Token itself |
| What does server do to authorize users' request? | Look up database to find the right session | Decrypt the user's token and verify its signature |
| Server can manage the authentication operation | Yes, because server is keeping session info | No, because token is stored in client |
| Potential security danger | CSRF attack | Token steal |
JWT
JWT stands for JSON Web Token, which is the token that is used for transmitting information between parties as a JSON object equipped with compact and self-contained way2.
JWT consists of three parts, and each parts are separated by dots(.).
- Header: It contains type of token (in most cases
"JWT"), and signing algorithms (in most cases"HS256"). - Payload: Statements about entity and additional data (a.k.a. Claims).
- Signature: Part where creating signature.
Some pros of JWT are:
- As same as token-based authentication, server does not need to store every single users' authentication information, which will help to reduce DB overload and simplifies scaling and load balancing.
- RBAC (Role-Based Access Control) or authorization are easy to be implemented.
Drawbacks of JWT
However, relying on JWT solely on JWT could be very dangerous in terms of securities.
- Although JWT is signed, this does NOT mean it also encrypts the content inside. Everyone can decode and view contents inside if secret keys are not properly maintained.
- Since server does not have control of users' authentication information, it is hard to manage the unexpected errors of authentication. This means you are basically allowing user to multiple login with different advices, which is quite bad choice if you're thinking of building application that does security matter (e.g. banking app, online course app, etc).
- JWT is very vulnerable of being hijacked. Malicious hacker can carry out different types of attacks on application with the authenticated information.
Strategies to improve JWT
So after extensive research, I found out what are some ways to improve JWT authentication.
JWT content can be exposed to everybody
🙋 Well then let's encrypt the content one more time! We can use library such as jose for encrypting contents and carry out JSON Web Encryption (JWE).
😐 Wait a minute... We need to think two aspects on this.
- Encrypting contents of JWT can be costly for server when hashing. As our application does not require super high security level like financial apps, it could be an overkill.
- That being said, and most importantly, do we really need to put sensitive contents in our access token? JWT could be used only for authentication and authorization. Any data fetching that requires authenticated layer will be done after server checks and verify JWT signature successfully.
😎 Therefore, we can include only few necessary information that are not sensitive such as user's id and its role for implementing RBAC and avoid double encryption.
Our server does not have direct control over user's authentication. Therefore, JWT is highly vulnerable when being hijacked.
🤔 That's true. Then we can set access token expiration date as shorter as possible, like 5 minutes.
That means users should sign-in every 5 minutes, which might be quite cumbersome job for them.
😎 We can take advantage of refresh token which normally has longer expiration date than access token (e.g. 1 month).
Refresh token will be used listerally for getting new access token. To be more specific,
- When user successfully logins with correct
passwordandusername, server will give both access token and refresh token to the user. - Refresh token will be saved in the database.
- When access token expires (e.g. 5 minutes), server will look up refresh token that matches up with user's
id. - If there is no refresh token in database or expired, then we need to ask users to login again.
Implementing JWT authentication
Downloading NPM packages
npm i jsonwebtoken && npm i -D @types/jsonwebtokencreateAccessToken method
createAccessToken method literally creates the access token once user successfully logged in.
Initialization
Create createAccessToken method within AuthController class
(If you want to, you may just make it as function and export it to connect with Router later).
Providing type for
We are going to include contents in our JWT token below.
_id: This is the unique user ID value.role: This indicates the user's role. This will be used in RBAC later.
Thus, let's tell our JWT payload that these contents will be included always with custom type.
JWT signature
createAccessToken method will take payload that has been sent after successful login.
We will pass _id and role value within payload object for signing.
For this, we wil be using .sign() method
which takes first parameter of payload and second parameter of secretOrPrivateKey.
JWT secret key
For secretOrPrivatKey, you may need to choose wisely and save it as an environment variable (.env) and keep it secret (.gitignore).
This key must NOT be exposed to public by any case!
Setting expiration date
Life of access token should be shorter as possible to make it expired quickly so that hackers cannot abuse it although token has been hijacked.
With using expiresIn property, you can set the life of access token.
If you want to, you may also conceal the expiration date and save it as an environment variable.
class AuthController {private static createAccessToken = () => {};}
createRefreshToken method
createRefreshToken method looks as exactly same as createAccessToken except:
- Different secret key for generating refresh token
- Expiration date of refresh token
class AuthController {private static createRefreshToken = (payload: CustomJWTPayloadType) => {return jwt.sign({ _id: payload._id, role: payload.role },"Your Refresh JWT secret key goes here", // 👉 You'd better create different secret key for refresh token{expiresIn: JWT_REFRESH_EXPIRES_IN, // 👉 It has longer life than access token});};}
handleRefreshToken method
This method is the method that helps to re-issue the new access token based on the refresh token saved in database.
Initialization
handleRefreshToken will be using both Request and Response object.
Check existing refresh token
We will check if there is already refresh token is available.
req.cookies will check if there are any name with refreshToken.
If refreshToken is not available for some reason, it will throw 401 error.
Finding user with the refresh token
Next, let's find a user with the refresh token before handleRefreshToken can actually re-issue new access token with it.
With using Model.findOne(), we can find user with the existingRefreshToken.
Again, if there is no user with the refresh token, that means that user does not have any authenticated information so it will throw 403 error.
Verifying JWT token
Once all validations were successfully done, we will verify if existingRefreshToken is valid signed token.
We can do this by using jwt.verify().
Error handling
We can pass callback function as the third parameter of jwt.verify() method. Let's start with error handling.
- If there were any errors or
- If user's
idvalue does not matches up with_idvalue ofdecodedrefresh token or - If there is no
decodedrefresh token whatsoever,
We will throw 403 error for authentication problem.
Issue new access token
If there are no errors whatsoever, we will take _id and role value from the user,
and create new access token which is exactly same way of createAccessToken method does.
Send new access token in cookie
Finally, send the newly re-issued access token through cookie.
In order to send access token in safer way, we can use httpOnly cookie so that client cannot view it with using res.cookie property.
import { Request, Response } from "express";class AuthController {public static handleRefreshToken = async (req: Request, res: Response) => {};}